
04:32
Aug 3, 2023
3
3
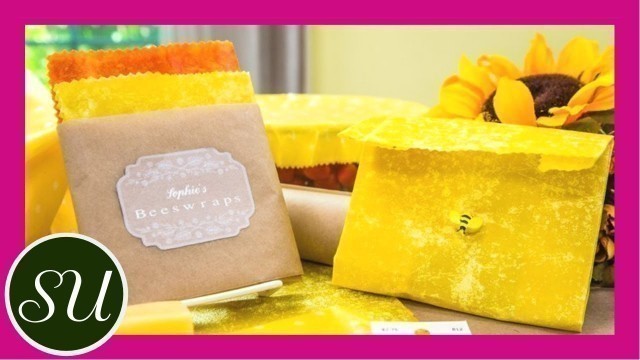
'Today I\'m showing you how to make your very own wax wraps, which are used to store your food. This is an amazing way to be eco-friend, and healthy (beeswax is naturally anti-bacterial)! The wraps are used as bowl covers or sandwich holders. You can even sew little buttons to the wraps to use for presents. When it comes to washing, keep in mind that wax doesn’t melt, so run under cold water. Materials - Clothes pegs with hooks or skirt hangers - 1 cup beeswax pellets - An old baking sheet with a half to one inch lip - Heat -proof gloves - Cotton fabric - Pinking shears - Large sewing needle - Buttons - Kitchen Twine Instructions 1) Pre-heat your oven to 200 degrees F 2) Set up your clothes pegs or hanger. I got pegs that have hooks on them, so I just hooked them on a rack above my oven. That way I knew I could place the baking sheet underneath to catch drips. Another idea is to stick magnets to clothes pegs, and then you can attach them to the hood of your range. Or, I just figured out that a skirt hanger will do the job too! Just take a minute to figure this out. But keep in mind that that the wax dries super quickly, so if you can\'t work out the peg/hanger thing, you can just hold the wax coated fabric up for about 60 seconds, and it will stop dripping. 3) Meanwhile, cut either square or round shapes out of your fabric. I traced around a dinner plate and a dessert plate for my round shapes. Use pinking shears to cut to prevent edges from fraying. (1 cup of wax will make about 5-7 dinner plate size wraps.) 4) Sprinkle the beeswax over the base of your pan and place in the oven for about 5 minutes, or until the wax has completely melted. Keep an eye on it because there is a fine line between it completely melting and smoking! 5) Now it\'s time to work quickly: Remove the baking sheet from the oven and lay a fabric shape in the melted wax. Use tongs to make sure the fabric is completely soaked with wax. If you have sensitive hands, wear heat-proof gloves. I didn\'t bother because I swear I have \"asbestos\" hands. 6) Either hold the fabric up until the wax stops dripping and sets (about a minute or so), or clip them up with the pegs. (Don\'t worry if you mess up. You can always pop the fabric in the pan, and place it back in the oven for a couple of minutes until the wax has liquified again.) 7) Lay your coated fabric flat. 8) Once dry you can fold the wax-coated fabric into a pouch or just fold it up. 9) Using kitchen twine, I sewed a couple of vintage buttons onto my sandwich pouches for easy closure. But of course, this is optional, but great if you are making them for gifts. To Use: When you are ready to use it, just warm it up with your hands and bend it over or around whatever food you want to keep fresh. They work great for cheese, veggies, sandwiches, and to cover bowls and containers. To Wash: You can wash them using eco-friendly dish detergent and cool water (do NOT use hot water because you don\'t want the wax to melt!) Keep in mind that beeswax is naturally anti-bacterial. Join the Gorgeously Green Family
Tags: Sandwich Wrap (Food) , DIY beeswax wraps , plastic wrap alternative , eco friendly food wraps , beeswax sandwich wraps
See also:



!['[4K] Bangkok Evening Walk | Thai Street Food Near Ratchathewi BTS Skytrain'](https://cdn-img01.wowfoodrecipes.com/images/51-m/342/342460_m.jpg)



comments